(This article is re-formatted from the following publication:
Mustacich, R. 2016. Seeing Only the Cancel. The American Revenuer, 69(3): 79-82.)
By Robert V. Mustacich
Introduction
Revenue collector’s true confession: sometimes I’m more interested in the cancel than in the stamp. Have you ever felt this way? Have you ever wished you could view a cancel without the stamp? I found myself wishing I had a magic bleach solution which would fade out the design of the stamp and leave the cancel undisturbed. After a long search, I’ve discovered that such a “bleach” does exist, although iA comparison of two different placements of a color reference area for cancel extraction. The corner placement in the upper example contains more dark colors which reduce the extracted cancel. The use of a region of lighter colors in the lower example strengthens the extracted cancel, but with the trade-off of less removal of the darkest colors of the stamp design.n digital form, made possible by computer imaging. The best part is that you can use it too! The process of “image extraction” involves only three steps, and is so simple that almost anyone will be successful with it.
Examples
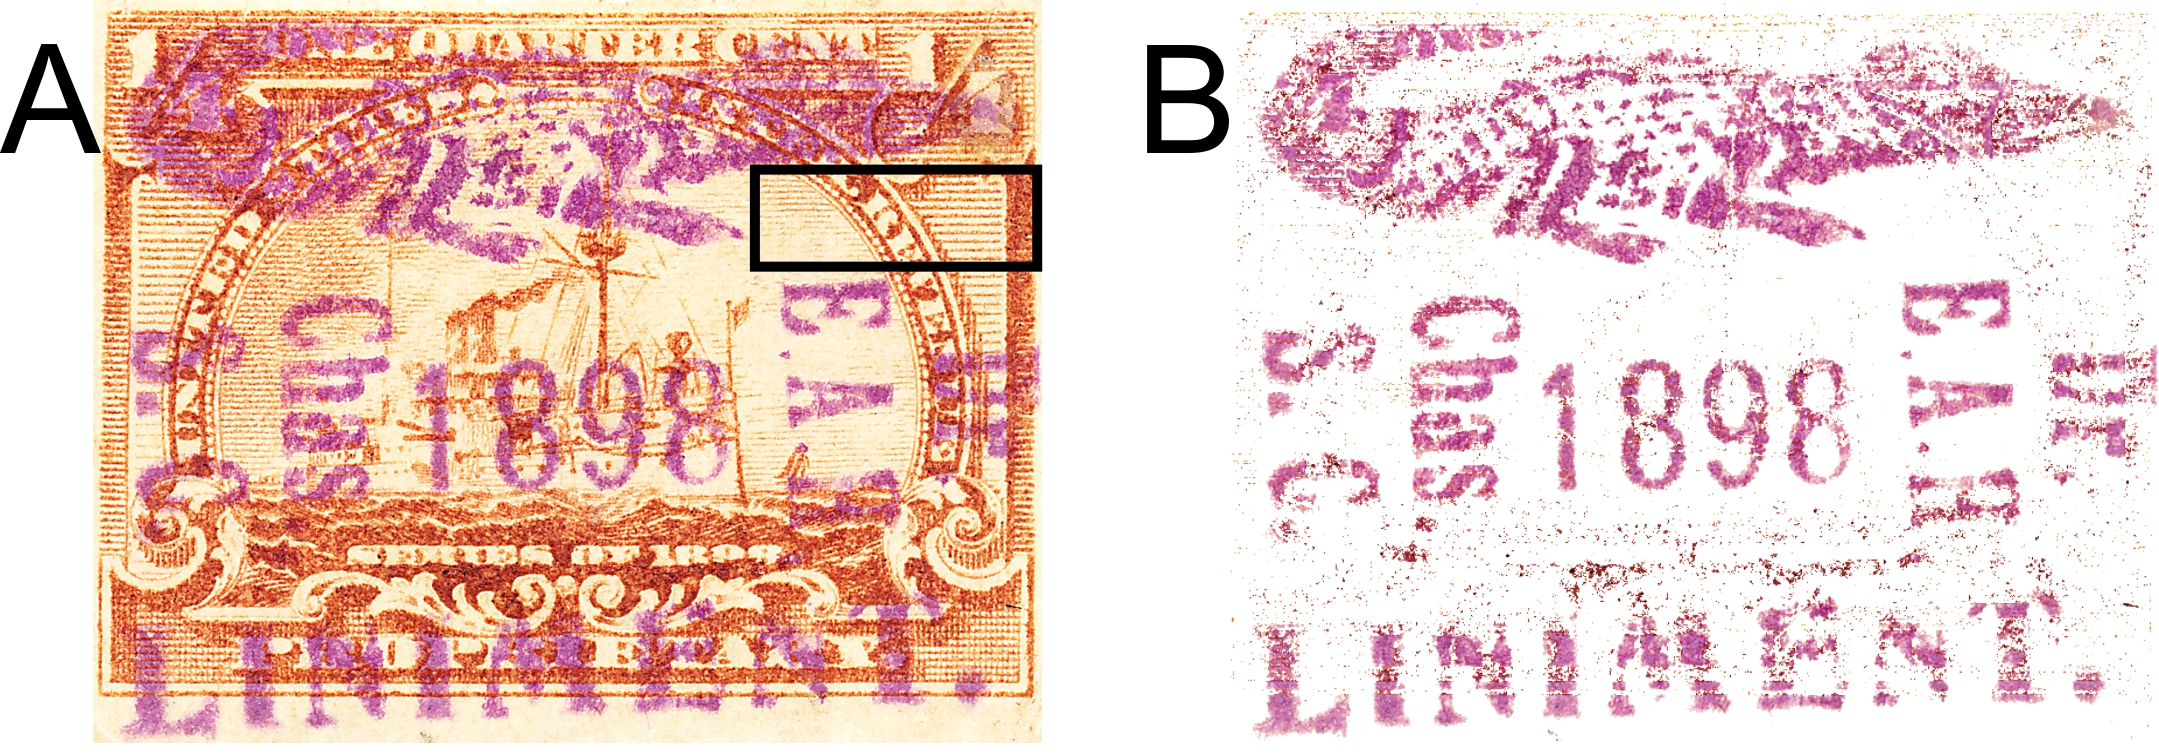
Figure 1. Example extraction of a fancy cancel from the image of an 1898 Proprietary stamp. The small rectangular black box in A contains the range of reference colors used to extract the cancel shown in B.
Figure 1-A shows a ¼ cent revenue stamp for the proprietary product “Alligator Liniment,” with a violet fancy cancel. The next image (Figure 1-B) is the same stamp after the image extraction process, so only the cancel remains.
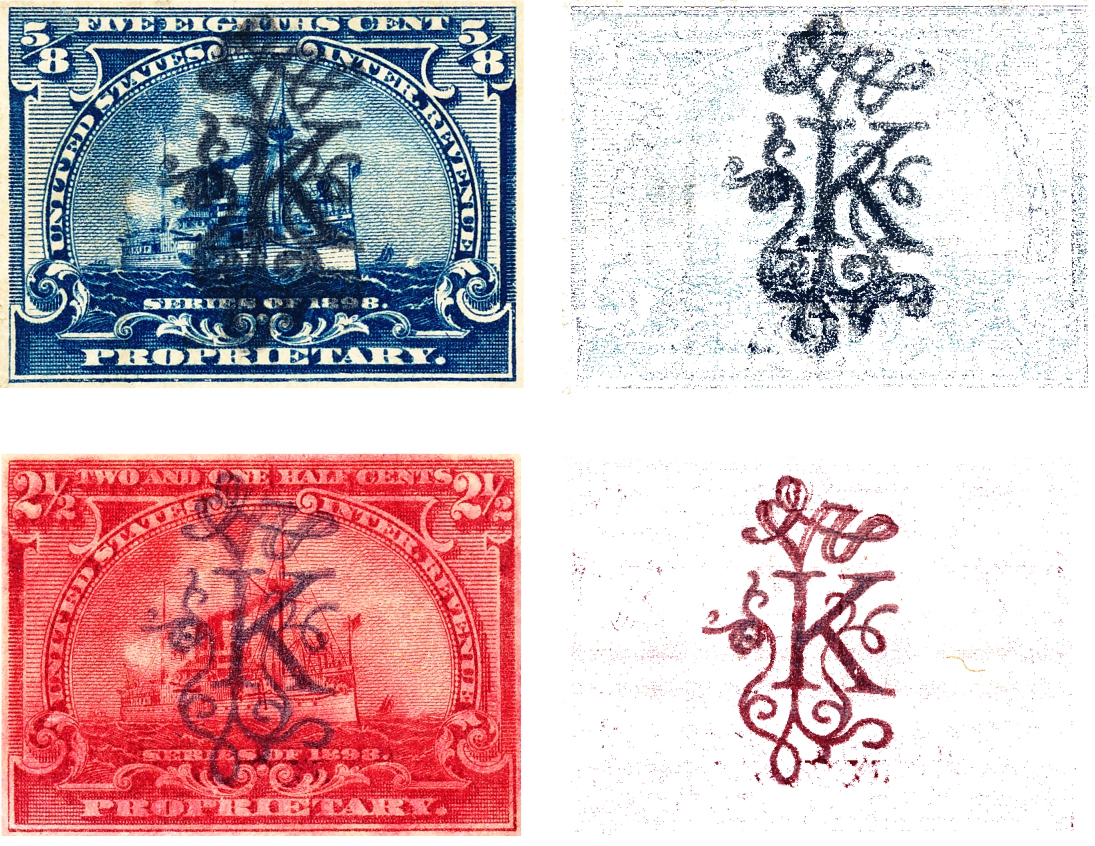
Figure 2. The extraction of an embellished letter K cancel stamped with black ink from two different colors of stamps.
Figure 2 shows the extraction of a fancy cancel, hand-stamped in black ink, on two different colors of proprietary stamps. The design appears to be the same for both, but the two cancels vary in both the amount of ink and precision in which the cancel was applied. The cancel on the 5/8 cent stamp is heavier and appears smeared in the lower portion of it. In contrast, the cancel on the 2½ cent stamp is sharper, but shows some doubling near the top of the cancel. This may be the result of less inking and double contact of the uppermost part of the cancel. Observe that the transparency of the black ink stamped on red print gives the extracted cancel a blackish-red color.
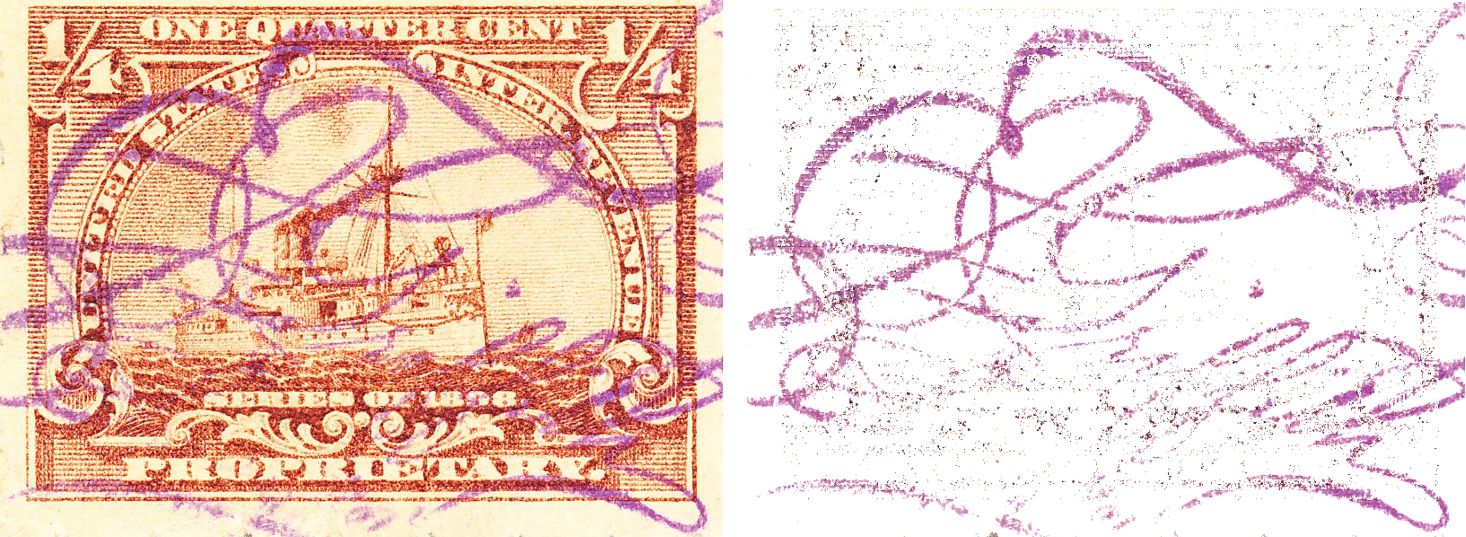
Figure 3. The extraction of a fancy hand-stamp cancel in a manuscript style that is difficult to read over the background of the stamp design.
This method of extracting cancels can be used to help with the legibility of certain cancels. Figure 3 contains an example of a cancel that appears to be a hand-stamped design based on a fancy script. Extraction of the cancel provides an easier-to-read view of the name “Griffith” in the script. The cancel appears to read “E Griffith” with perhaps some additional information faintly below the name. The left edge of the design is repeated in the upper right edge of the stamp, revealing that this is indeed a stamped design. Once extracted, it is not difficult to examine the original stamp with a magnifier and find the details of the name “Griffith,” but it was not correctly read until extracting it. I have not found this method useful, however, for very faint cancels.[1]
How It Works
An area of the stamp is selected which contains the colors you wish to erase, but does not contain any of the cancel. Notice the small black box in Figure 1a – this is the “reference color area,” containing the colors to be removed. These colors are deleted from the stamp image, leaving only the cancel. The image extraction software is on my website, www.battleship-revenues.com. Select “Cancel Extractor” on the top menu bar. The process is very simple:
1. First make a color scan of a stamp you wish to examine. I recommend 300 dpi or greater resolution in JPEG (JPG) or PNG format.
2. Use the “Browse” button to find the image file and open it.
3. Select a reference color area by moving the mouse while pressing the mouse. You will see a rectangle highlighted on the image.
4. Click the “Use Selected Area” button.
5. Click the “Save” button.
The selected area has “handles” on it so that it can be resized using the mouse. Also, the selected area can be moved in its entirety by using the mouse button anywhere within the rectangle and “dragging” the area around the image until the button is released. By clicking on the “Use Selected Area” button, the extracted cancel appears to the right of the image. Changes to the selected reference area can be made with the mouse as just described, and the extracted cancel is updated by re-clicking the “Use Selected Area” button. The “Save” button is used at any time to save an image of the extracted cancel.
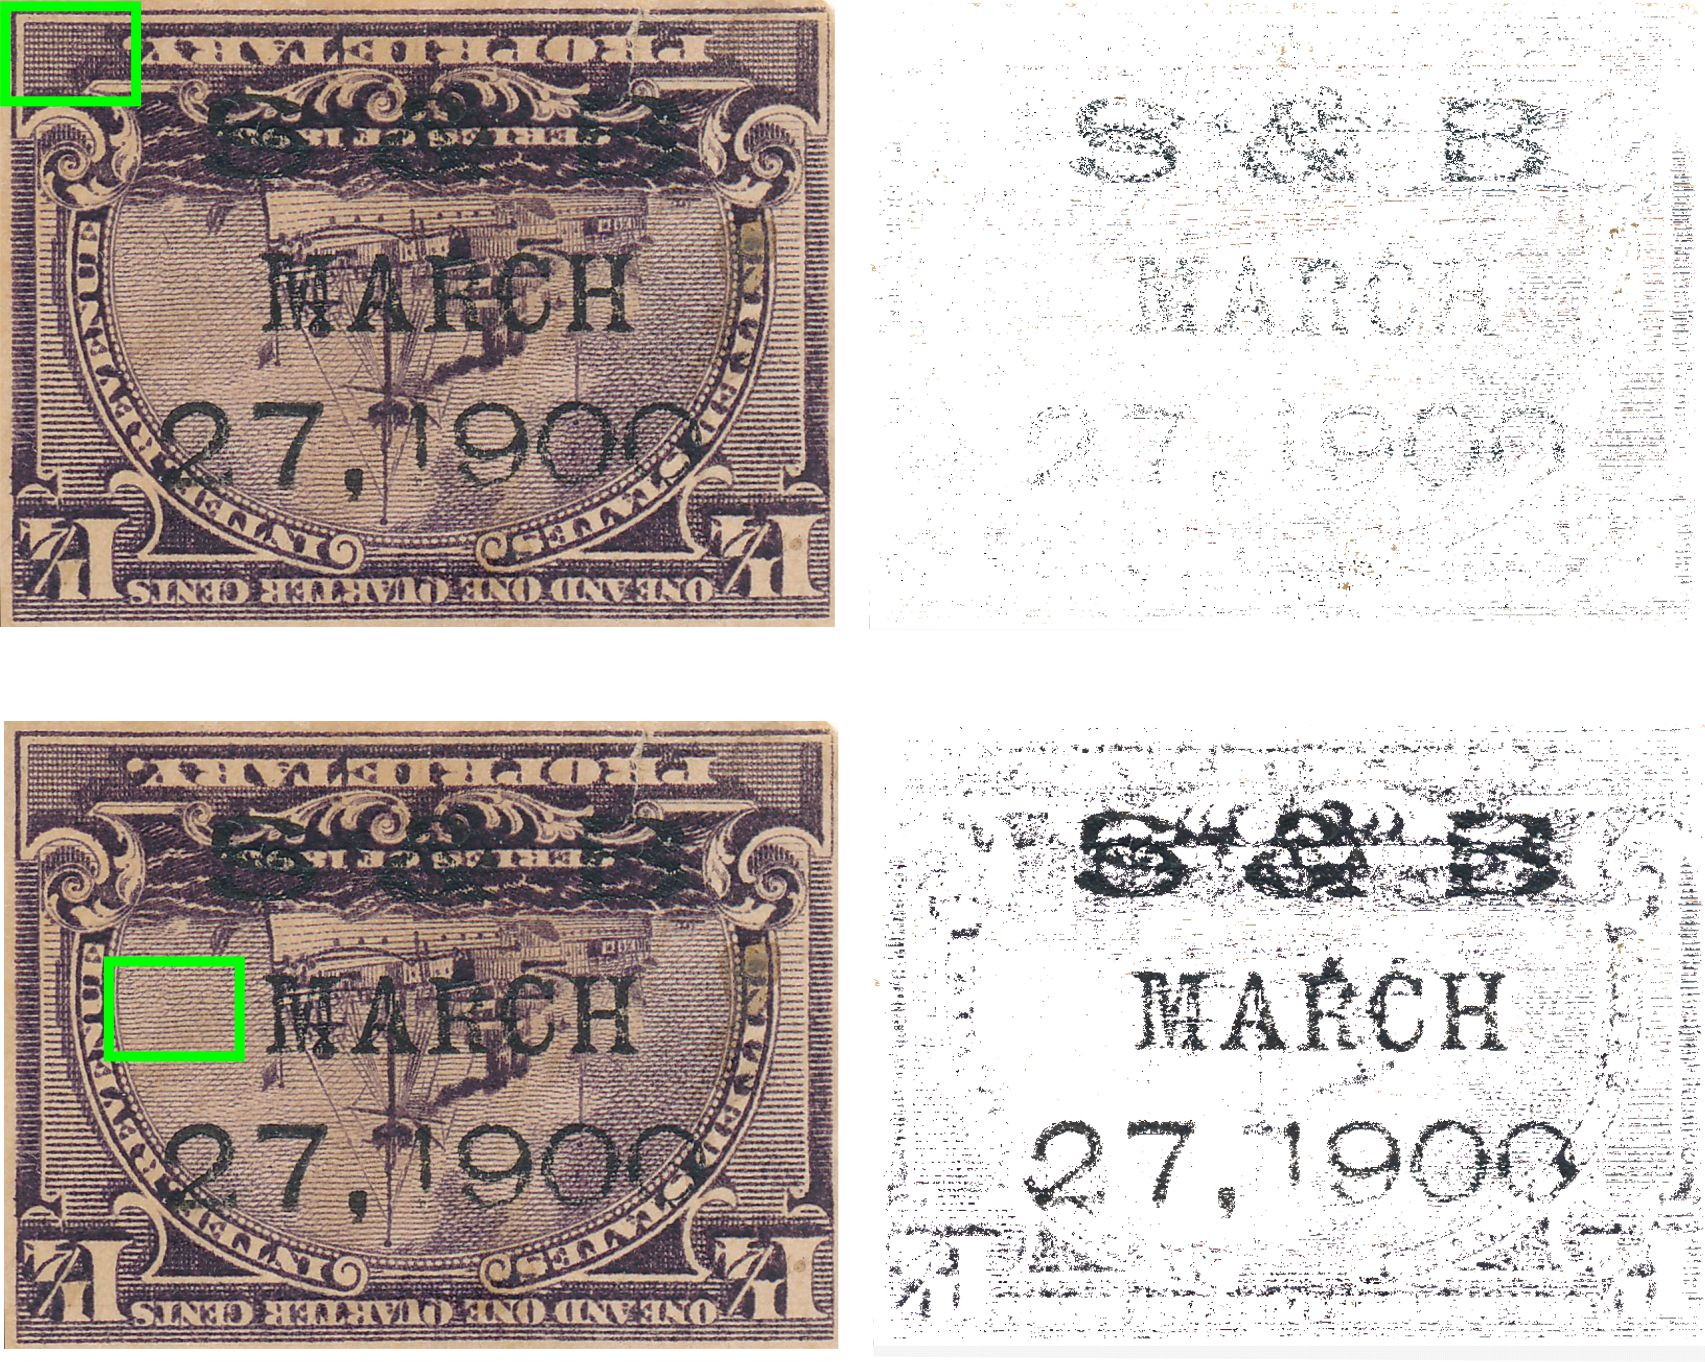
Figure 4. A comparison of two different placements of a color reference area for cancel extraction. The corner placement in the upper example contains more dark colors which reduce the extracted cancel. The use of a region of lighter colors in the lower example strengthens the extracted cancel, but with the trade-off of less removal of the darkest colors of the stamp design.
It is easy to manipulate the size and location of the reference area to advantage in extracting a cancel. Figure 4 demonstrates the enhancement of a cancel extraction by moving the reference color area. The upper extraction uses a reference area in the upper left (the green rectangle) which contains dark ink colors. The transparent black ink is stamped over these colors and the extracted result loses some of dark colors using this reference area. The lower example is the same size reference area dragged down to a region of the stamp with lighter inking. In this case the cancel is very bold, although the design of the stamp weakly remains as a trade-off. Similarly, the size of the reference area can be changed to achieve the same effect.
This process also can easily perform a sequence of different color removals. After saving a result and then opening this saved file, additional color selections can be removed from the image. This can be an advantageous way to proceed with weaker cancels, in that limited ranges of color can be chosen to minimize the loss of the cancel. Then, it is often easier to test further color elimination with the smaller number of remaining colors and quickly find which choices maximize the remaining cancel. Figure 5 shows the extraction of a weaker cancel spanning different colors on a document using a sequence of several color selections.[2] The following sequence of samples was used for color removal: a small area of lighter blue from the hair in the portrait in the 2 cent bank check; an area of darker blue that remained; a small area of lighter green from the hair on the portrait in the 3 cent foreign exchange stamp; a small area of residual darker green; and a sample of the red printing and paper color of the check. When working from the directory with the saved files (for some web browsers this is the “Downloads” folder), only a single click is required after saving the file to “Browse” to it for the next round of color removal. An enlargement of the resulting cancel for the Pennsylvania Mining Co. on this Michigan check used as currency is shown to the left of the document.
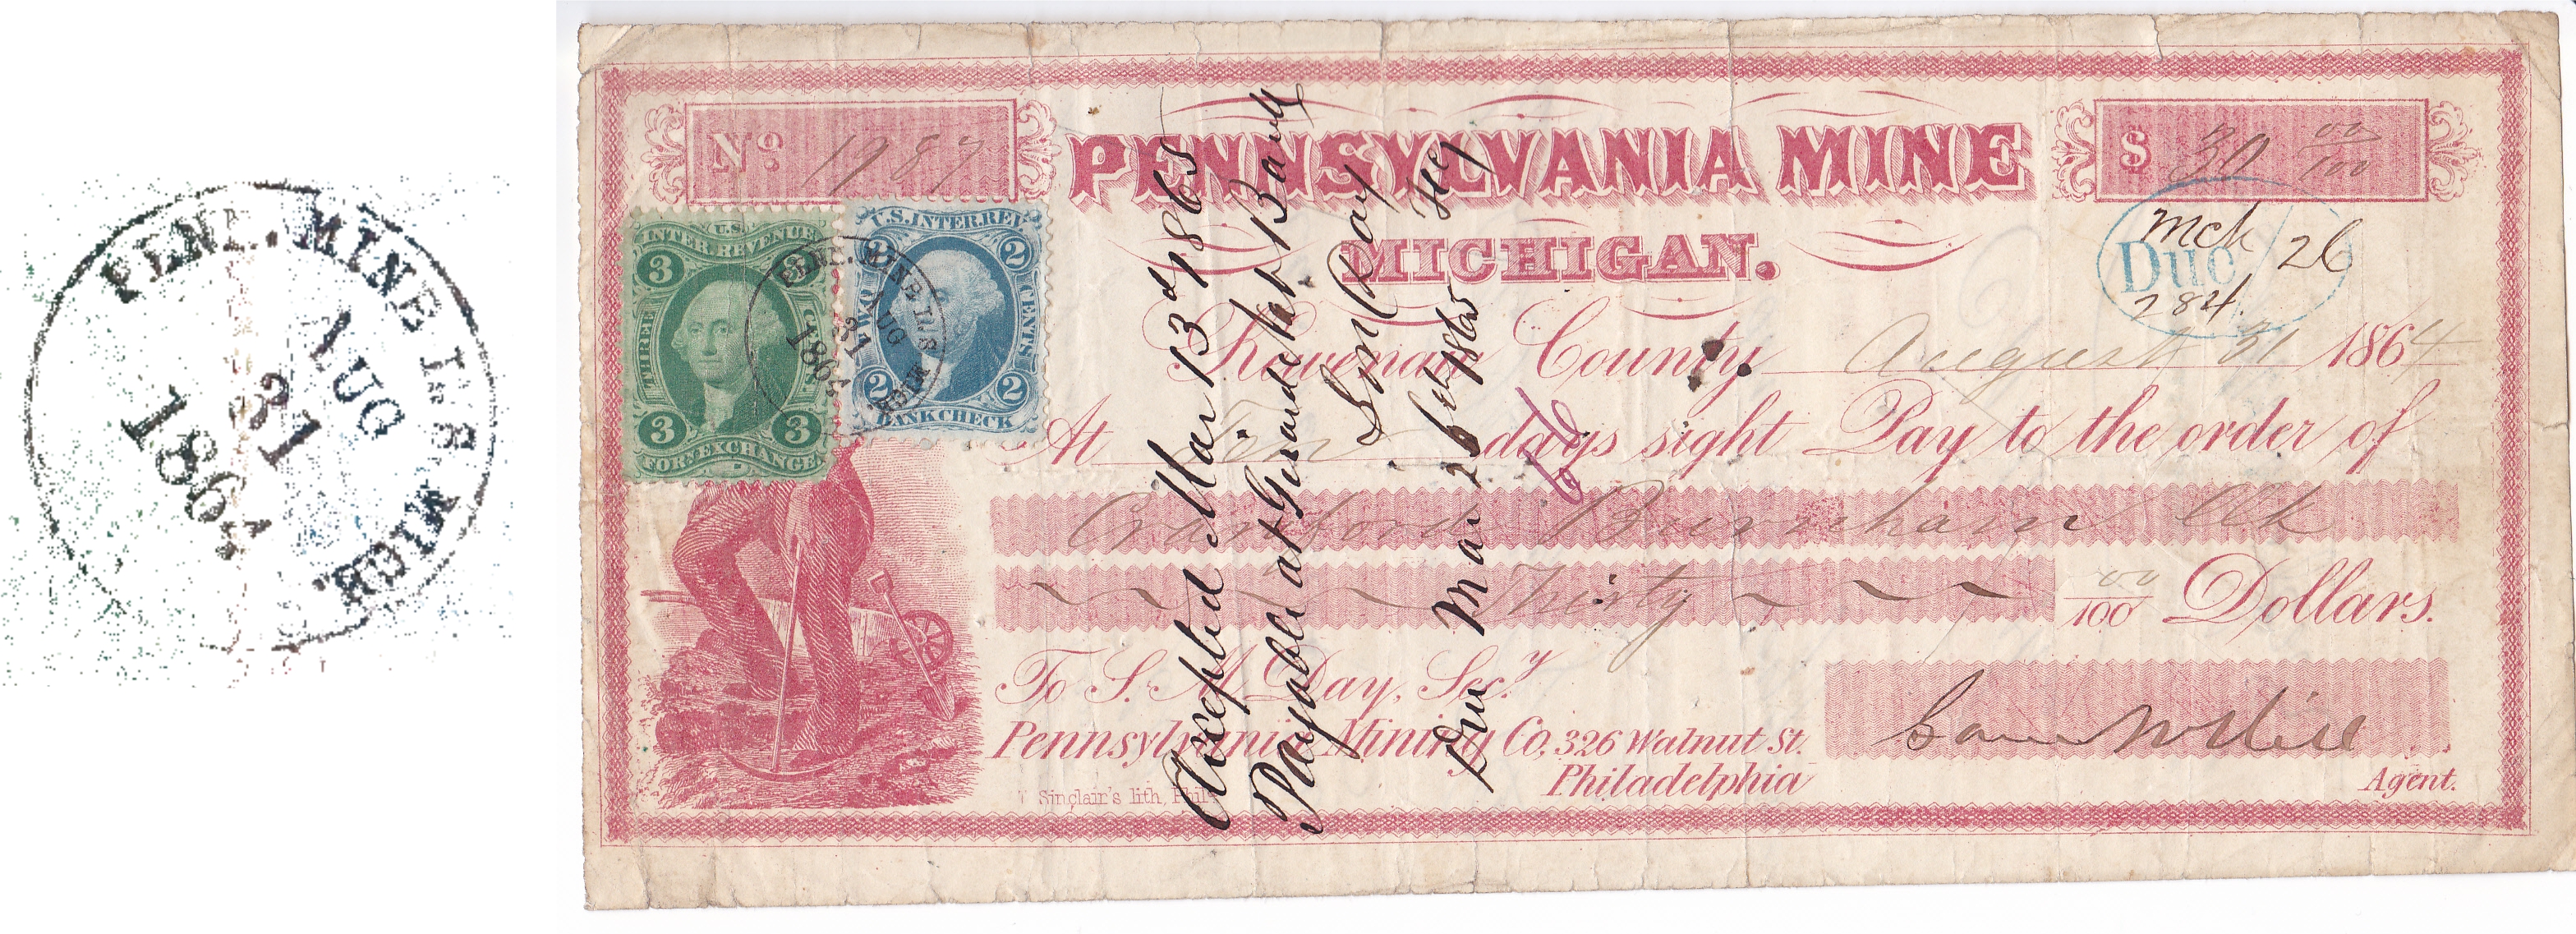
Figure 5. An example of a 5-step sequence of color removal to extract a weak cancel from the multi-colored background of a check used as currency. An enlargement of the extracted cancel is shown to the left of the document. The sequence is described in the text.
Nuts and Bolts
Finding a method for isolating the cancel resisted my efforts for a long time. My failed experiments with cancel extraction led to other image analysis studies such as perforation (Mustacich, 2014, 2015, 2016a), and then the detailed comparison of digital images (Mustacich, 2016b). This comparison of digital images was indeed a direct attack on the problem of extracting the cancel, but it is complex, requires much computation, and relies on carefully collected reference images. Its real value turned out to be measuring small differences in printing plates and die transfers, rather than a simple way to extract cancels. However, I recently realized that the stumbling block was the great complexity of standard digital images, which include too many colors for a simple extraction process. I found a solution that was far simpler than I had ever imagined: reduce the number of colors.
Displays of digital images consist of an array of colored dots, called pixels. One of the most common pixel formats is “RGB color” with one byte of color value for each of the color channels (Red, Green, and Blue). A byte consists of 8 bits of digital information (the minimal ones and zeros used by digital computers), so this format is most often called 24-bit RGB color. Each 8-bit color channel has 256 (28) possible intensity values, and the total number of color possibilities with three color channels is 256x256x256, a number exceeding 16 million colors! No wonder 24-bit RGB images look so good. But imagine that we are trying to analyze the color in a region of a stamp image that measures 50x50 pixels. This is a total of only 2500 pixels, and perhaps half of them are just the unprinted paper color between tiny spots or lines of printing. This amounts to a very limited sample of the colors out of the 16 million-plus 24-bit RGB color possibilities. While the pixels for inked areas of a single-colored stamp will mostly share a common hue, they will vary significantly in their specific RGB values. If we choose another similar area of the same stamp, we will likely find a different assortment of RGB values for the same general hue. For this reason, it’s difficult to exactly match up the RGB values present in one sample area with those of another sample area. By resorting to a more sophisticated analysis of hue, the range of RGB values is “generalized” in a sense, and a range of hue can be similarly used to isolate a cancel (Cibulkis, 2016).
As I stated above, reducing the number of colors used in representing an image provides a direct and simple way to determine a range of colors for removal without resorting to further analysis. For example, 12-bit RGB color would involve 16 (24) possible intensity values for each color channel and result in a total of 16x16x16 = 4096 possible different colors. Compared to more than 16 million colors with 24-bit RGB color, this means that each of the possible color values in the 12-bit representation itself contains 4096 different 24-bit RGB colors. By simply counting up the 24-bit RGB colors from an area of the stamp image (without the cancel) that belong to each of the 12-bit values, this 12-bit representation effectively groups very similar colors together into a lower resolution distribution of the colors.[3] For color removal from the full image, any pixels having values found in this low resolution distribution from the sample area can be replaced with white. The pixels with colors from the cancel, being different from the sampled stamp color, are unaffected, so they remain from the original image.
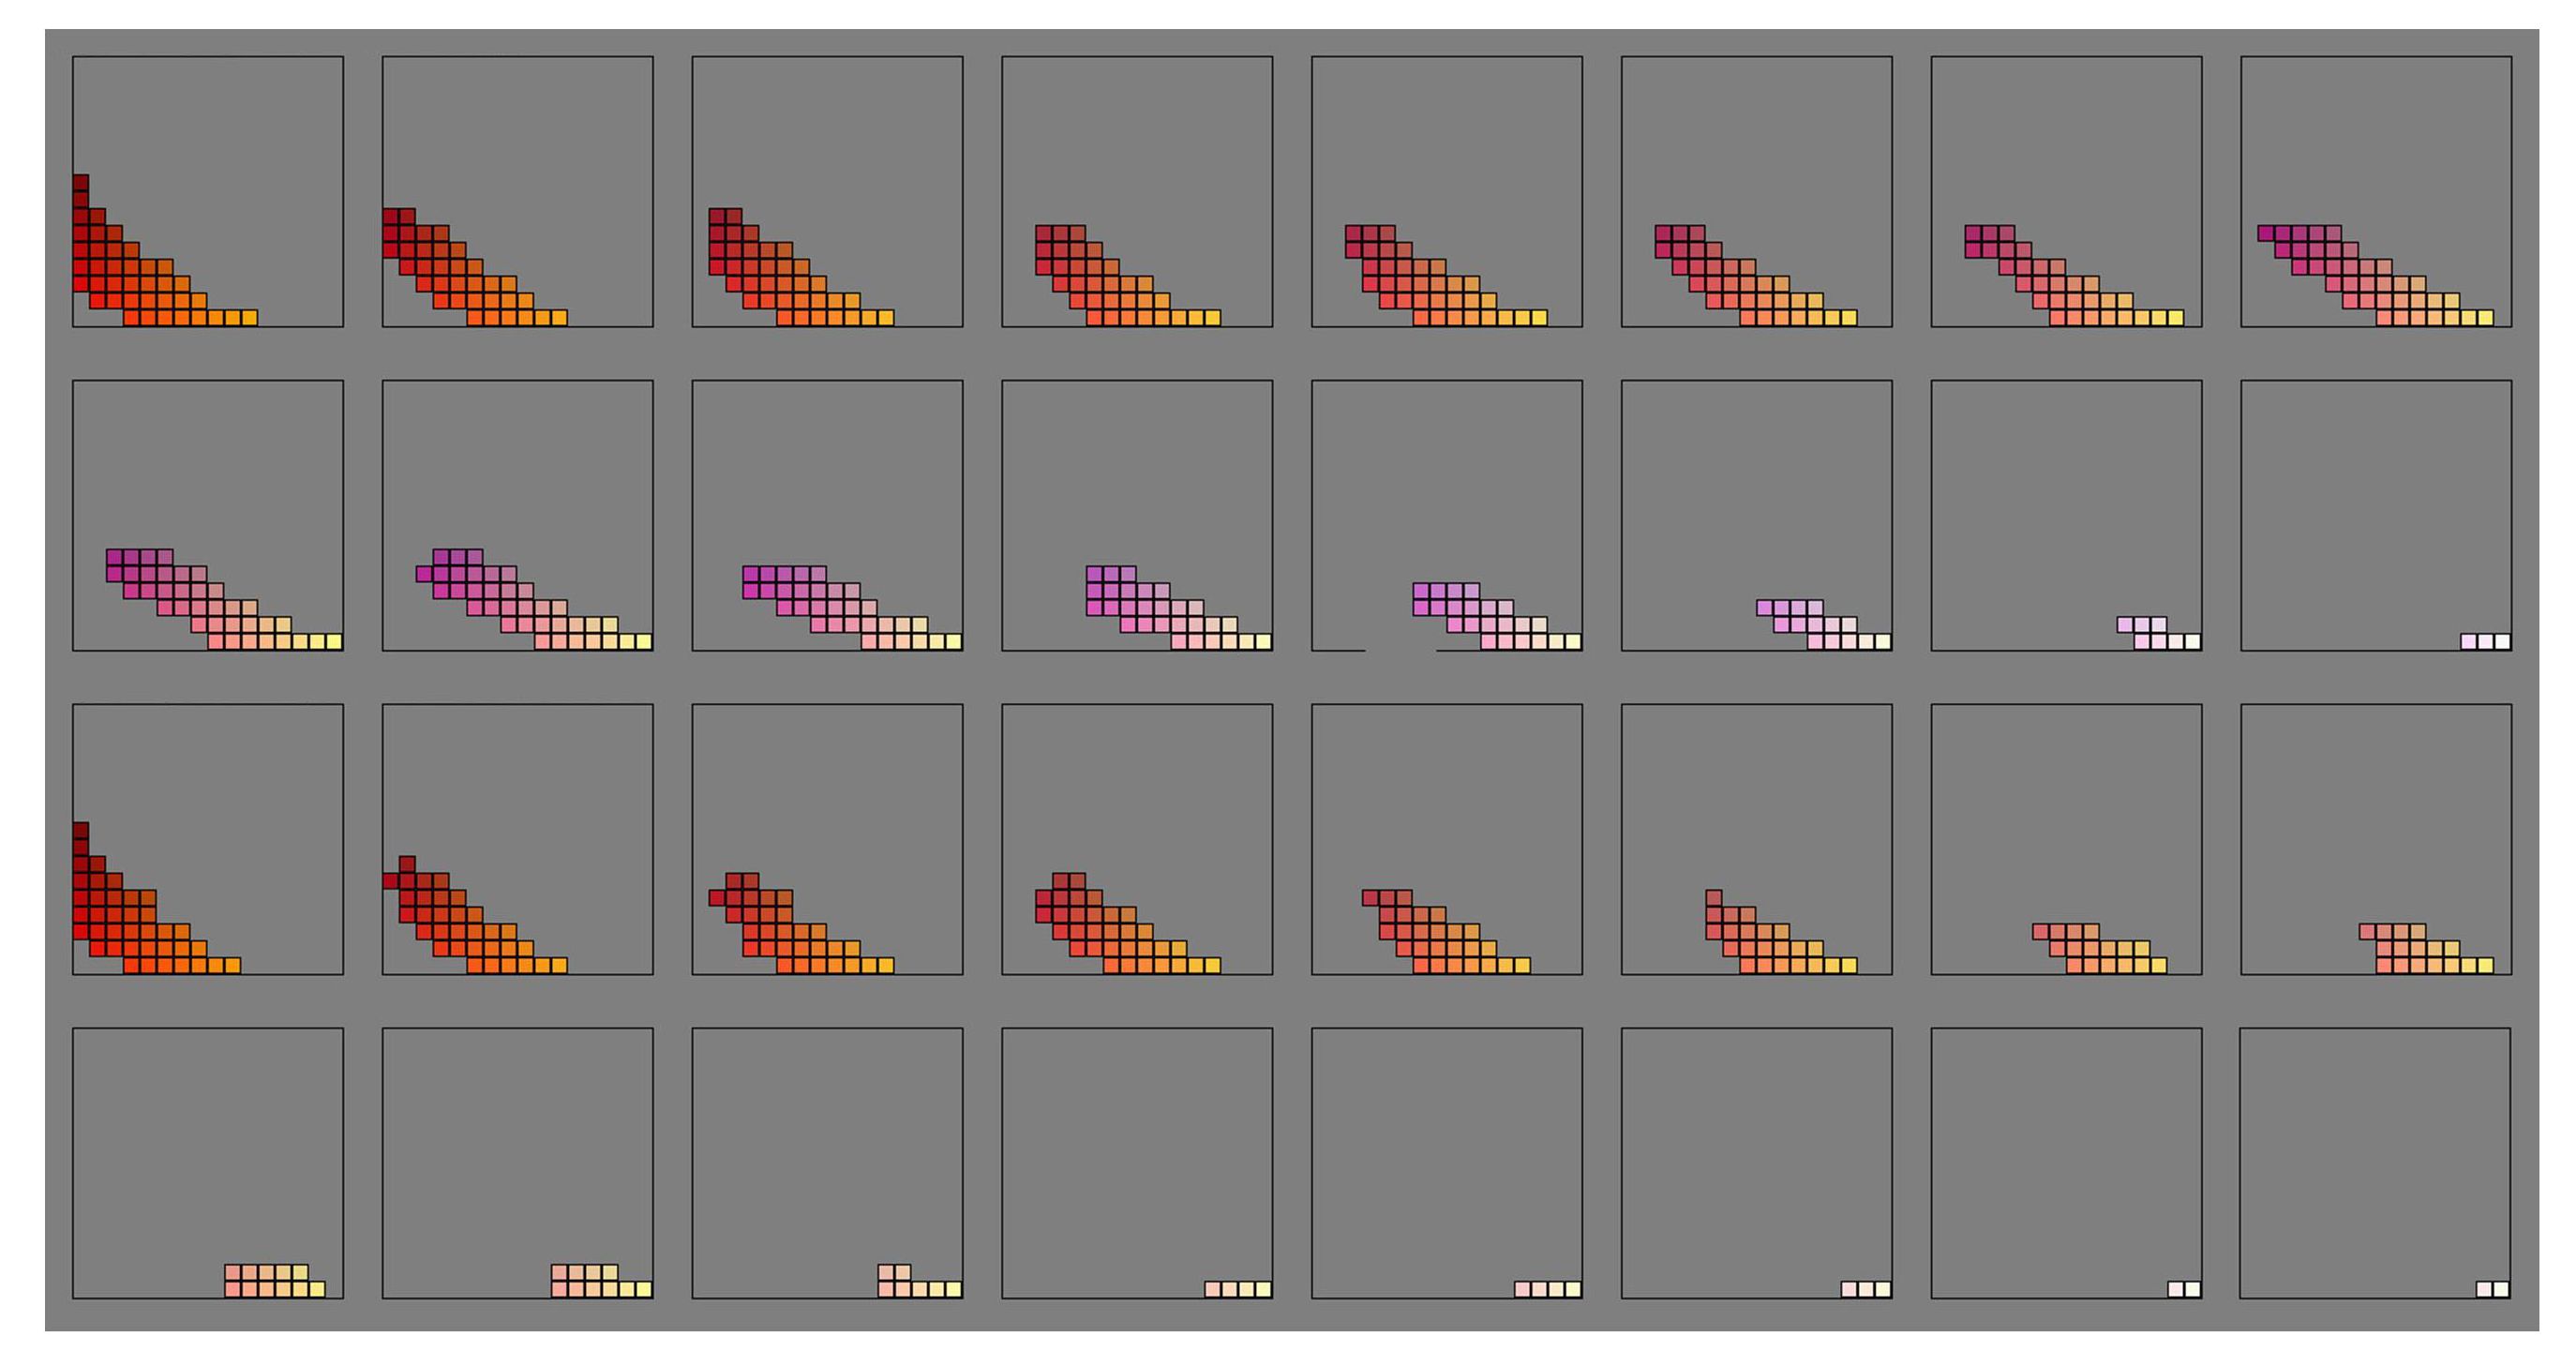
Figure 6. A detailed view of the 12-bit color representation for the full stamp and the reference area for the ‘Alligator Liniment’ stamp shown in Figure 1-A. The 4096 color possibilities for 12-bit RGB color can be viewed as a 16x16x16 cube, which is most easily viewed in 16 slices each having 16x16 colors. The upper two rows are the slices for the full stamp, while the bottom two rows are the slices for the reference color area shown as a black box in Figure 1-A. Note that the bottom rows representing the reference area lack the violet colors clearly visible in the top two rows. This difference determines the image colors retained for the cancel extraction.
Figure 6 illustrates the detailed color differences between the two different 12-bit color distributions used to extract the cancel in Figure 1-A. The possible 4096 colors can be viewed by slicing the 16x16x16 color cube of 12-bit RGB possibilities into a stack of 16 horizontal slices of 16x16 colors each. The color black (Red=0, Green=0, Blue=0) is located at the upper left corner of the first slice at the top left. Proceeding left to right, the 16th slice (the rightmost slice in row 2) has the color white (Red=15, Green = 15, and Blue = 15 in 12-bit RGB color) at the bottom right corner. For each slice, the Red component value increases from the top (0) to the bottom (15), and the Green component increases from the left (0) to the right (15). The slices themselves correspond to the sixteen values of Blue ranging from 0-15. The first two rows in Figure 6 show the distributions of the 12-bit colors for the entire stamp including the cancel. The final two rows shown the distributions for the reference area on the stamp image in Figure 1-A bounded by the black rectangle. Comparing the second and fourth rows of Figure 6, it is clear that the reference region does not contain appreciable amounts of the violet hues present in the cancel. This difference appears to become noticeable from about the 5th slice in the first row onward. In this approach to removing color, all pixels in the image having colors represented in the 3rd and 4th rows (the reference color area of the stamp) are simply replaced with white pixels. The violet colors of the cancel remain as shown in Figure 1-B.
Importantly, reducing the color resolution from 24-bits to 12-bits results in a distribution of the colors that is effectively free of gaps (as can be seen in Figure 6), even with a somewhat limited number of pixels in the color sample. Thus, it is not necessary to do any modeling or color analysis to fill gaps that occur in high resolution color distributions. Consequently, little data will be overlooked in this simplified analysis. Computationally, all that is required for the conversion to 12-bit RGB data is to divide each of the original 24-bit RGB color intensity values by 16. Testing with 15-bit color resolution did not appear to offer any advantages over 12-bit resolution.
References
Cibulkis, John. 2016. In a personal communication, John has informed me that similar results can be obtained using color analysis to isolate the cancel in the hue histogram, and then only display the pixels whose hues lie in the specified interval.
Mustacich, Robert. 2014. Freak or Fake? A New Fingerprinting Method for Distinguishing between Original and Fraudulent Extra Perforations of 19th Century Revenue Stamps. The American Revenuer 67 (1): 2-19.
Mustacich, Robert. 2015. Fake Perforations on 19th Century U.S. Revenue Stamps: A Stroke of Luck. The American Revenuer 68 (4): 90-96.
Mustacich, Robert V. 2016. Measurements of Stamp Separation Features by Digital Image Analysis. Proceedings of the Second International Symposium on Analytical Methods in Philately, Itasca, IL, November 2015, John H. Barwis and Thomas Lera, eds., Wilcox Printing and Publishing, Inc., Madrid, IA, pp. 73-85.)
Mustacich, Robert V. 2016. Digital Image Differencing of High Resolution Stamp Images. Proceedings of the Second International Symposium on Analytical Methods in Philately, Itasca, IL, November 2015, John H. Barwis and Thomas Lera, eds., Wilcox Printing and Publishing, Inc., Madrid, IA, pp. 57-72.)
University of Utah, 2016. Online document analysis using retroReveal, J. Willard Marriott Library, Salt Lake City, UT, www.retroreveal.org.
[1] For very faint cancels, there is not enough difference between the stamp color and the cancel color for this method to separate them. This appears to be a consequence of image noise (color and/or luminosity, for example), and consequently too much of the content of the faint cancel is present elsewhere on the stamp as image noise. Pre-processing images to reduce color noise increased extraction of faint cancels, but with a significant loss of resolution. Rather than removing any colors and possibly losing some of the content of the faint cancel, it may be better to use “filters” that retain different color components. I recommend retroReveal software for exploring this possibility since it provides a number of such methods that can potentially enhance the view of faint cancels (University of Utah, 2016).
[2] This document is a check written to the clerk and signed on the reverse without endorsement, turning it into a $30 bearer note, equivalent to a “$30 bill” (Mike Mahler, private communication).
[3] I am using the number of pixels in the image area being analyzed divided by the number of possible 12-bit colors (4096) as a “threshold” for determining whether a color is significant in the image. If the possible colors were evenly distributed among all the pixels, this ratio would be the average number of pixels of each color. For example, an 800 x 1000 pixel image would have a threshold of 800x1000/4096 = 195 pixels. Any 12-bit color in the 800 x 1000 pixel image with more than 195 occurrences in the image would then be included in the color representation of the image.